Here is a short tutorial about how to install LAMP (Linux, Apache, Mysql and PHP) on a Linux VPS
Tag: tutorial
How to Setup RDNS or PTR Record for your IPv6 IP in your VPS Control Panel
Here is a brief video tutorial on how to setup RDNS or PTR Record for your IPV6 IP from your VPS Control Panel
Getting Errors while booting a OpenVZ 7 VPS Container running on Ploop File System ?
Getting errors like:
2019-08-09T08:24:10-0400 : Error in e2fsck (fsutils.c:471): e2fsck failed (exit code 4)
2019-08-09T08:24:10-0400 vzctl : CT 392 : Failed to mount image /vz/private/392/root.hdd: Error in e2fsck (fsutils.c:471): e2fsck failed (exit code 4)
[41]
#vzctl start 392
Starting container…
Opening delta /vz/private/392/root.hdd/root.hdd
Adding delta dev=/dev/ploop61204p1 img=/vz/private/392/root.hdd/root.hdd (rw)
/dev/ploop61204p1p1: UNEXPECTED INCONSISTENCY; RUN fsck MANUALLY.
(i.e., without -a or -p options)
Error in e2fsck (fsutils.c:471): e2fsck failed (exit code 4)
Failed to mount image: Error in e2fsck (fsutils.c:471): e2fsck failed (exit code 4)
It can happen due to a file system crash or VPS Node crash etc…, don’t worry follow following tutorial to fix.
Solution:
1)Stop the container.
#vzctl stop 392
#vzlist 392
2)Mount the ploop image.
#ploop mount /vz/private/392/root.hdd/DiskDescriptor.xml
3)Perform fdisk -l
#fdisk -l /dev/ploop61204p1
4)Perform a file system check for the partition(note p1 at the end):
#e2fsck /dev/ploop61204p1p1
5)Unmount the ploop image
#ploop umount -d /dev/ploop61204p1
Unmounting device /dev/ploop61204p1
6)Start the container
#vzctl start 392
How to install WordPress in your cPanel Web Hosting from Hosteons
Here is a short video tutorial showing how easy it is to install WordPress in your cpanel web hosting service with hosteons.com
How to enable iptables in CentOS 7
Just use the following commands to disable firewalld and enable the good old iptables in any CentOS 7 based VPS or server:
[root@test2 ~]# systemctl stop firewalld
[root@test2 ~]# systemctl mask firewalld
Created symlink from /etc/systemd/system/firewalld.service to /dev/null.
[root@test2 ~]# yum install -y iptables iptables-services
Loaded plugins: fastestmirror
Loading mirror speeds from cached hostfile
* base: mirror.centos.org
* extras: mirror.centos.org
* updates: mirror.centos.org
base | 3.6 kB 00:00:00
extras | 3.4 kB 00:00:00
updates | 3.4 kB 00:00:00
Package iptables-1.4.21-24.1.el7_5.x86_64 already installed and latest version
Resolving Dependencies
–> Running transaction check
—> Package iptables-services.x86_64 0:1.4.21-24.1.el7_5 will be installed
–> Finished Dependency Resolution
Dependencies Resolved
=========================================================================================================================================
Package Arch Version Repository Size
=========================================================================================================================================
Installing:
iptables-services x86_64 1.4.21-24.1.el7_5 updates 51 k
Transaction Summary
=========================================================================================================================================
Install 1 Package
Total download size: 51 k
Installed size: 25 k
Downloading packages:
iptables-services-1.4.21-24.1.el7_5.x86_64.rpm | 51 kB 00:00:00
Running transaction check
Running transaction test
Transaction test succeeded
Running transaction
Installing : iptables-services-1.4.21-24.1.el7_5.x86_64 1/1
Verifying : iptables-services-1.4.21-24.1.el7_5.x86_64 1/1
Installed:
iptables-services.x86_64 0:1.4.21-24.1.el7_5
Complete!
[root@test2 ~]#
[root@test2 ~]# systemctl enable iptables
Created symlink from /etc/systemd/system/basic.target.wants/iptables.service to /usr/lib/systemd/system/iptables.service.
[root@test2 ~]#
[root@test2 ~]# systemctl start iptables
How to update SSH Port in CentOS 7

Here are few simple steps on how to update SSH Port in CentOS 7 VPS or Dedicated Server
Edit the SSHD configuration file :
nano -w /etc/ssh/sshd_config
(if nano is not installed use any other text editor or install it with yum -y install nano)
and change the Port number from 22 to any custom port you choose :
e.g. Port 18989
Make sure to even remove the # mark before Port
Save the config file
SELinux is enabled by default in CentOS 7 so you need to even inform SELinux to change the SSH Port else it won’t allow you to restart SSHD with new Port.
To run semanage for updating SSHD Port you nee to first install policycoreutils, install it with :
yum -y install policycoreutils-python
now update SeLinux policy to allow new port for SSH service. to do this, run below :
semanage port -a -t ssh_port_t -p tcp 18989
now you need to update Firewall policy to allow new SSH Port, to do this run below :
firewall-cmd –permanent –zone=public –add-port=18989/tcp
firewall-cmd –reload
systemctl restart sshd.service
SSHD Port is now updated, you can now connect to your new SSH Port: 18989
Setup OpenVPN on a KVM Based VPS like hosteons

Just run following command as root on a CentOS / Ubuntu / Debian based VPS or Dedicated Server and follow the prompts to install OpenVPN:
wget https://git.io/vpn -O openvpn-install.sh && bash openvpn-install.sh
Once it ends, you can run it again to add more users, remove some of them or even completely uninstall OpenVPN.
It works even on the cheapest VPS Package provided by hosteons.com
Quick setup of L2TP or IPsec VPN on CentOS, Ubuntu or Debian
One line setup:
First get a fresh install of Ubuntu LTS, Debian or CentOS on your hosteons VPS or Dedicated Server (VPS should be KVM based not OpenVZ, if you are using hosteons.com VPS then need not worry as it’s KVM based VPS)
Use following command to set up an IPsec VPN server on Ubuntu or Debian:
wget https://git.io/vpnsetup -O vpnsetup.sh && sudo sh vpnsetup.sh
If you are on CentOS then use following command:
wget https://git.io/vpnsetup-centos -O vpnsetup.sh && sh vpnsetup.sh
Your VPN login details will be randomly generated, and displayed on screen when finished.
Also it’s best to run these commands in a screen session to avoid any interruptions due to any reasons.
Custom Setup of VPN:
Ubuntu and Debian:
Make sure your VPS/Dedicated server is upto date, you can do it with following commands:
apt-get update && apt-get dist-upgrade
and reboot.
Now Edit the script and provide your own VPN credentials:
wget https://git.io/vpnsetup -O vpnsetup.sh
nano -w vpnsetup.sh
[Replace with your own values: YOUR_IPSEC_PSK, YOUR_USERNAME and YOUR_PASSWORD]sudo sh vpnsetup.sh
CentOS:
Make sure your VPS/Dedicated server is upto date, you can do it with following commands:
yum -y update
(if you are using hosteons.com vps then need not worry, our templates update everything when the VPS is setup)
Now Edit the script and provide your own VPN credentials:
wget https://git.io/vpnsetup-centos -O vpnsetup.sh
nano -w vpnsetup.sh
[Replace with your own values: YOUR_IPSEC_PSK, YOUR_USERNAME and YOUR_PASSWORD]sh vpnsetup.sh
Your VPN server is now ready, just connect using the Shared Key, username and password you provided during setup or displayed on script, depending upon how you setup your VPN.
Upgrade to Kernel 4.x on CentOS 6/CentOS 7/ RHEL 7

Kernel 4.x is highly optimised and gives a lot of boost in performance to all Linux servers, here are few simple commands to upgrade your Kernel to 4.x on your CentOS 6 / CentOS 7 / RHEL 7 VPS (It will work with any KVM Based VPS like the ones provided by hosteons.com) or Dedicated server :
CentOS 6 / RHEL 6:
rpm –import https://www.elrepo.org/RPM-GPG-KEY-elrepo.org
rpm -Uvh http://www.elrepo.org/elrepo-release-6-8.el6.elrepo.noarch.rpm
yum install yum-plugin-fastestmirror
yum –enablerepo=elrepo-kernel install kernel-ml
Now update /etc/grub.conf and make sure the new kernel 4.x is selected as default kernel and just reboot your VPS/Dedicated Server to use the new kernel.
CentOS 7/RHEL 7:
rpm –import https://www.elrepo.org/RPM-GPG-KEY-elrepo.org
rpm -Uvh http://www.elrepo.org/elrepo-release-7.0-3.el7.elrepo.noarch.rpm
yum install yum-plugin-fastestmirror
yum –enablerepo=elrepo-kernel install kernel-ml
Now update /etc/grub.conf and make sure the new kernel 4.x is selected as default kernel and just reboot your VPS/Dedicated Server to use the new kernel.
Reset root password when stuck at FSCK
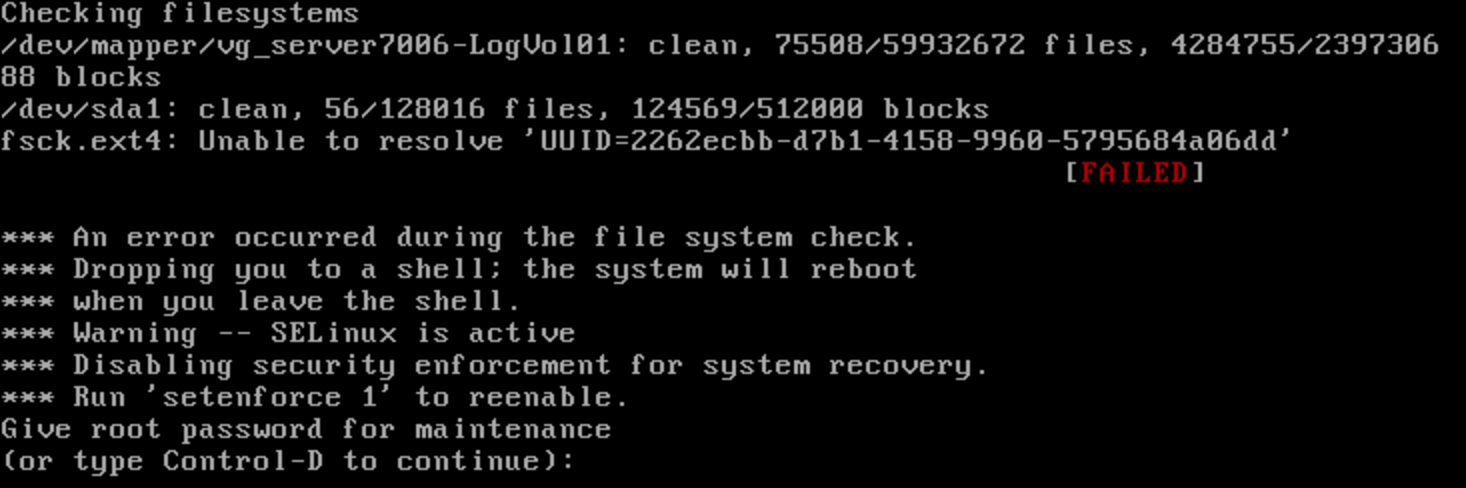
Stuck at FSCK but your root password is not working ?
Here is a short tutorial on how to reset root password on a Linux VPS or Dedicated Server
- First login to your VPS control panel and use VNC to access the VPS Console and if it’s a Dedicated server either use the IPMI or use a KVM to go to console of your server.
- Now let your system boot and press spare on grub menu to pause the system from booting and going at fsck prompt
- Now select the last working kernel and press ‘e’
- Now Go to the link similar to below and press ‘e’: “kernel /vmlinuz-x.x.x.x root=UUID.x.x.x.x ro rhgb quiet”
- Delete ‘ro’ from the line and append ‘init= /bin/bash’ for CentOS or ‘init= /bin/sh’ for Debian
- Press ‘Enter’ or ‘Return” key to save and the press ‘b’ to boot into single user mode
- Now the system should directly take you to your single user mode shell. Now type below command to mount the / file system in read write: mount -o remount rw /
- Once / File system is mounted, you can then change the root password with “passwd” command
- Now you can again reboot your system and run fsck using the above root password