Changing your SSH port is a simple yet powerful way to reduce brute-force login attempts and improve server security. To make this process easier, Hosteons offers a free Bash script that automatically handles the switch across all major Linux distributions — including firewalls and SELinux!
✅ Supported Operating Systems
Ubuntu 20.04 / 22.04
Debian 11 and above
CentOS 7 / 8
AlmaLinux 8 / 9
⚠️ Important Disclaimer
Changing your SSH port can lock you out if anything goes wrong.
Make sure you have console access such as VNC, IPMI, or KVM before using this script.
V2Ray and ShadowsocksR (SSR) are popular tools for bypassing internet restrictions and enhancing online privacy. With Hosteons’ VPS, you can easily set up your own private proxy server using V2Ray or SSR. This tutorial will guide you through the installation and configuration process step by step.
Prerequisites
Before you begin, ensure you have:
A VPS: Hosteons provides reliable VPS solutions with root access.
Linux OS: Ubuntu 20.04 or Debian 11 are recommended.
Root Access: Administrative privileges on your VPS.
Step 1: Update Your VPS
Start by updating your system to ensure all packages are up to date:
Download and install a V2Ray or SSR client on your device.
Configure the client with the server details, including IP address, port, and UUID or password.
Connect to the proxy server and verify your connection.
Conclusion
Setting up V2Ray or ShadowsocksR on a VPS from Hosteons enhances your online privacy and allows you to bypass internet restrictions. With this guide, you can deploy your own secure and private proxy server in minutes. If you encounter any issues, Hosteons’ support team is available to assist you.
If you’re looking to host a website or web application, setting up a reliable server stack is essential. Nginx, PHP, and MySQL provide a powerful combination for serving dynamic content efficiently. This guide will walk you through setting up Nginx, PHP, and MySQL on a Linux VPS from scratch.
You now have a fully functional server running Nginx, PHP, and MySQL, ready to host your website or application. This stack provides a robust, secure, and efficient foundation for your web hosting needs. If you’re using Hosteons’ VPS, you can take advantage of their reliable performance and support to ensure your setup runs smoothly.
WordPress is one of the most popular platforms for building websites, known for its flexibility and user-friendly interface. If you’re using a VPS (Virtual Private Server) for hosting, installing WordPress gives you greater control and performance than shared hosting. This guide will walk you through installing WordPress on a VPS in just five simple steps.
Step 1: Set Up Your VPS Environment
Before installing WordPress, your VPS needs the appropriate software stack to support it. Most WordPress installations require:
Linux Operating System (e.g., Ubuntu or CentOS)
Web Server (Apache or NGINX)
Database Server (MySQL or MariaDB)
PHP
How to Set Up the Environment:
Access Your VPS: Log in to your VPS using SSH. Open a terminal and type:
ssh username@your_server_ip
Update the Server: Keep your server software up-to-date.
Access WordPress in Your Browser: Open your browser and navigate to:
http://your_server_ip/wordpress
Follow the On-Screen Instructions:
Choose your language.
Enter your website name, admin username, and password.
Click Install WordPress.
Log In to Your WordPress Dashboard: Once the installation is complete, log in using the admin credentials you set up.
Conclusion
Congratulations! You’ve successfully installed WordPress on your VPS. By following these five simple steps, you now have a powerful, flexible WordPress site running on a robust VPS environment.
At Hosteons, we offer high-performance VPS hosting solutions optimized for WordPress, ensuring fast load times and reliable uptime. Ready to take your website to the next level? Explore our VPS plans at Hosteons.com today!
Need help with your VPS? Our 24×7 support team is here to assist you.
First login to your VPS control panel and use VNC to access the VPS Console and if it’s a Dedicated server either use the IPMI or use a KVM to go to console of your server.
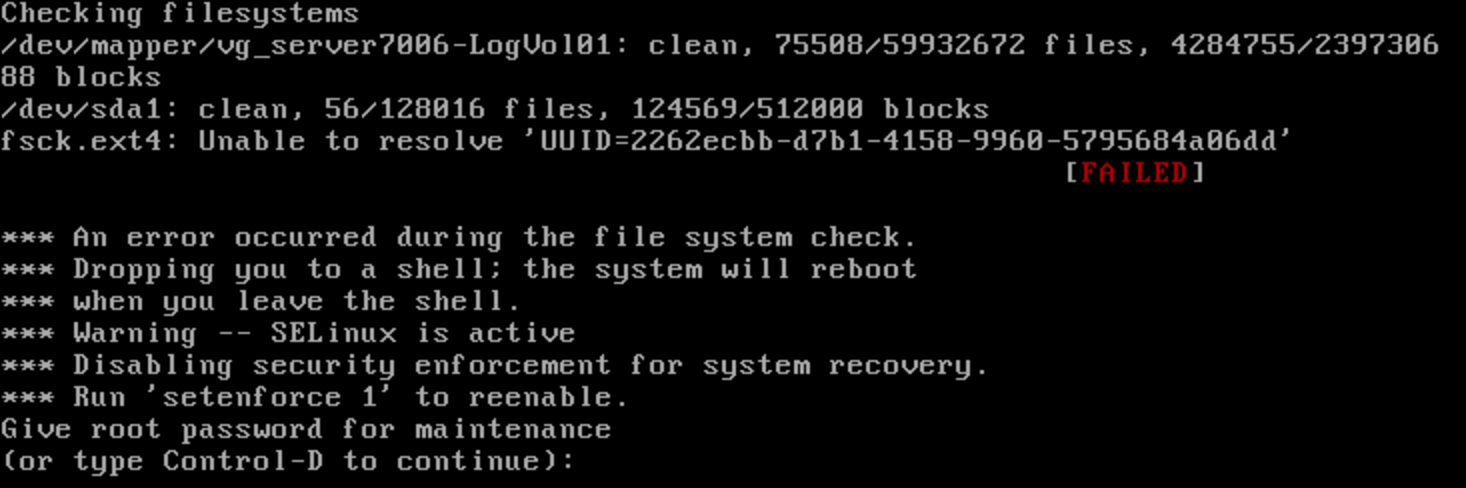
Now let your system boot and press spare on grub menu to pause the system from booting and going at fsck prompt
Now select the last working kernel and press ‘e’
Now Go to the link similar to below and press ‘e’: “kernel /vmlinuz-x.x.x.x root=UUID.x.x.x.x ro rhgb quiet”
Delete ‘ro’ from the line and append ‘init= /bin/bash’ for CentOS or ‘init= /bin/sh’ for Debian
Press ‘Enter’ or ‘Return” key to save and the press ‘b’ to boot into single user mode
Now the system should directly take you to your single user mode shell. Now type below command to mount the / file system in read write: mount -o remount rw /
Once / File system is mounted, you can then change the root password with “passwd” command
Now you can again reboot your system and run fsck using the above root password